
Wondering how to transfer videos from iPhone to Mac computers?
The iPhone has some of the best video technology on the market right now, and it makes sense that you’d want to take advantage of that to capture some awesome clips. Whether you’re using the 12MP camera of the iPhone 11 to take TikTok videos, or you’re shooting recordings of events with amazing panoramic features, you want to be able to back-up your content.
Knowing how to transfer videos from Macbook to iPhone and vice versa gives you a lot more control over your Apple products. You can even transfer large videos from iPhone to Mac computers to stop them from clogging up your memory.
Today, we’re going to guide you through the process of sending videos from your iPhone to other Apple products, step by step.
Table of Contents
How to transfer videos from iPhone to Mac computers
There are a few ways you can sync videos from iPhone to Mac computers.
The most obvious option will be to use the built-in cloud technology that Apple offers with its devices (iCloud). If you’re not already using iCloud with your Apple devices, then your videos won’t import automatically from your iPhone to your Mac, and so on.
If you do use iCloud, then you can choose which items from your phone you want to back up. This could mean that you frequently back up your contacts, videos, and pictures. The biggest benefit of the iCloud library is that your information syncs automatically across all your Apple devices.

If you don’t want to use the cloud system, then you can sync manually instead. This can sometimes be a better option if you want to move big videos quickly, without using a lot of bandwidth or data.
How to Transfer Videos from iPhone to Mac iCloud
Since choosing to sync videos from iPhone to Mac with iCloud is usually the easiest choice, we’ll start there. Start by making sure that you have the latest iOS version on your iPhone and your Mac. On your phone, go into Settings > General and > Software update to do this.
You’ll need to sign into all your accounts with your Apple ID to start using iCloud. Once you sign in, the iCloud feature should be automatically on. To check your iCloud settings, go into your Settings page on your phone, and tap on your name. You can choose iCloud from there.

Beneath the iCloud heading that shows you how much storage space you have, you’ll see a lot of switches for things like Contacts, Photos, Mail, and so on. You can flip these options on and off depending on what you want to save to the iCloud system.
Crucially, there are costs associated with the storage you use on iCloud, so do some budgeting in advance.
• 5GB storage: Free.
• 50GB storage: £0.79/$0.99.
• 200GB storage: £2.49/$2.99.
• 2TB storage: £6.99/$9.99
Make sure that your video and photos are available to sync across all iCloud accounts on your smartphone and do the same thing on your Mac.

To set up iCloud photo library for your Mac:
- Open your photos
- Click on Photos in the menu
- Click on Preferences
- Check the box next to iCloud photos
Make sure that you choose to optimize your Mac storage settings if you want to ensure that high-res versions of your photos and videos don’t clog up the space on your Mac.
If you sign up to have iCloud photos and videos sync across your account, they’ll update automatically. You’ll be able to see all your photos and videos whenever you sign into anything with your Apple ID. This option is great if you’re limited with space on your iPhone and Mac because you can take advantage of the cloud for more room.
Notably, while we’re talking about syncing photos between Apple iPhones and Mac’s here, there’s a Windows version of the software available, so you can do the same thing with a PC.
Do keep in mind that if you decide to transfer large videos from iPhone to Mac, it could take quite a while.
How to transfer videos from iPhone to Mac computers (iCloud Files)
If you want to transfer videos from iPhone to Mac computers with the cloud, here’s another idea.
If you like the idea of using an Apple service for your upload from iPhone to Mac, but you don’t want to use iCloud syncing, then you could consider using iCloud Files.

You’ll still need an iCloud account to use this service, you just have slightly more control over what you want to move at any given time. You might decide to turn automatic syncing off on your iPhone, and just upload videos as and when you choose.
The Files app is basically a shared folder in the iCloud environment, where you can store anything across any Apple devices. If you want to share a video from your iPhone to your Mac:
- Go to System Preferences on your Mac and click on your Apple ID or iCloud, depending on the Mac OS version you’re using.
- Go to iCloud Drive and click on Options
- Check your Documents and desktop folders
- Open the photo app in your iPhone
- Select the video you want to share and tap the share option
- Scroll down to Share to Files
- The Apple system will open your iCloud Drive so you can see all the folders available.
- Tap the folder where you want to add your photos
- Tap Save
How to transfer videos from iPhone to Mac with Cloud Storage
Remember, you don’t need to use Apple’s cloud system if you want to transfer files through the cloud. Arguably, it’s easier to stick with iCloud because you can sync all your files automatically throughout your Apple devices, but you might prefer to use something like Google Drive or Dropbox instead. If you were already using these file storage systems before you bought your iPhone, you can continue to access them with your Apple devices.
Dropbox and Google Drive even have their own mobile apps, where you can upload videos and photos from your device in seconds.

If you’re not sure how to transfer videos from iPhone to Mac using a third-party cloud storage system, don’t worry. It’s simple enough. Here is step-by-step insight into using Dropbox.
If you have the Dropbox mobile app, you can automatically ask Dropbox to sync your video and photo files to your Dropbox account. Open your Dropbox account and under backups click the box next to “enable camera uploads for”. In the drop-down menu, you can choose “photos and videos” for your iPhone.
Keep in mind that camera uploads won’t work if your battery is too low, or your device is set to roaming.
If you’re nervous that you’re going to use too much data by uploading automatically, you can set manual transfers too. Go into the Dropbox mobile app on your phone and click on the folder where you want to store your files. Click on the “+” sign at the bottom of the screen and hit upload photos. Tap on the Next button to select which videos or photos you want to add.
When you’ve selected everything you want to upload, just hit the upload button.
How to transfer videos from iPhone to Mac Via Messages/Email
If you’re hoping for a more lo-fi alternative to the options we’ve mentioned above, or you just want to send a single (Small) video to your Mac without the cloud, you could try emailing or messaging the video to yourself and opening it on your preferred device.
To send a video to yourself, go into the Photos or Videos file on your iPhone and find the video you want to send. Click on the “Share” icon and tap the icon for Mail or Message. This will pop the video into the message or video.
Remember that you might struggle to send some videos this way if you don’t have a lot of bandwidth available on your phone. You might be best sticking to emails rather than iMessage’s for your videos, as Apple does cap what you can send over Messenger.

An alternative option might be to send a video through Facebook Messenger, if you have that installed. You may struggle to download the content when it arrives on Facebook.
How to transfer videos from iPhone to Mac computers with Airdrop
An alternative (and faster) solution if you want to transfer large videos from iPhone to Mac is to use AirDrop. This is a feature on iPhones that allows you to share files between devices that are close together, using Bluetooth.
To begin, make sure you have AirDrop enabled on your smartphone and your Mac. Open your Mac and use the Finder option to track down AirDrop. The AirDrop option should be in the left-hand column, and the finder window will show you any devices that you can share with nearby. You might need to turn your Bluetooth off and on again if you don’t see any devices.
Next, go to your iPhone and check that you have Airdrop switched on. AirDrop should be active automatically for your iPhone, but if it’s not, long-press on the Wi-Fi button from your iPhone control panel and click AirDrop. Tap on the Contacts Only section to switch it to Everyone.

Now you’re ready to start sharing.
Open the Photos folder on your iPhone, or the Videos section if you have your videos stored elsewhere. Tap on the video that you want to share and click on the sharing icon (square with an upward pointing arrow). You’ll then go into the sharing menu, where you should be able to see available people you can share with – including your Mac.

Tap on the option to share with your Mac, and your iPhone will automatically send the file from your device into your Mac’s download folder. You can access the file from your Mac Dock.
How to Transfer Videos from iPhone to Mac via Apps
If you’ve checked out all the options for transferring videos we’ve covered above, and none of those appeal to you, your best option could be to use a third-party app.
There are a few different options out there, and they’re ideal if your iPhone is glitching in a way that stops you from using the iCloud or sharing settings.
One of the most popular options is the EaseUS MobiMover app. This basically lets you move any file format from your iPhone into your Mac or PC. You can even transfer batches of multiple files at once, and use the “preview before transfer” option.
To use the service, download the application on your Mac, and connect your iPhone to the Mac device. Run the EaseUS MobiMover on your Mac and choose “Phone to Mac”, then click the Next button.

Next, select “Videos” among your options, and click the default path to set the custom storage path that you want to use. Next, click Transfer.

When the transfer is complete, you’ll be able to view the videos on your PC. It doesn’t take a lot of time for everything to move over. However, if you’re transferring several large video files, you might have a little more trouble than you would with just one or two.
How to Transfer Videos from iPhone to Mac Manually
For the most part, we’ve been looking at ways to transfer video from iPhone to Mac devices using things like Bluetooth, the cloud, and apps. However, there will be times when you want to avoid all these options entirely.
Some people prefer to reduce the impact on their bandwidth and data by using manual syncing methods. Provided that you have a USB connector for your phone and Mac, that’s not a problem. If you’re just choosing to manually transfer photos from iPhone to Mac, you can use your Wi-Fi connection by setting up Wi-Fi syncing. The USB option may be better if you’re not sure about your Wi-Fi connection, or you’re moving a lot of large video files.
To turn on the Wi-Fi connection, go into the Finder sidebar on your Mac and click on your iPhone. Click General at the top of the window, then Show this device when on Wi-Fi
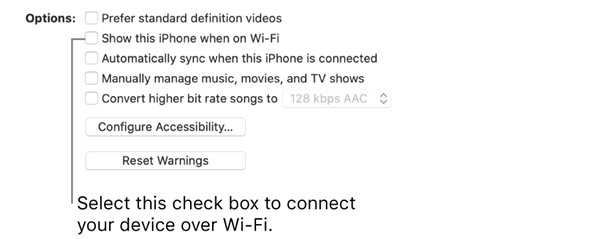
You will need MacOS 10.15 or later to access this feature.
Click the “Apply” button to sync the two devices over Wi-Fi.
If you prefer to connect over USB, make sure that you have a Mac with OS X 10.9 or later. You can connect your iPhone to your computer using the charging capable that came with your iPhone. Alternatively, use a lightning cable.

One you’re connected, go to the Finder sidebar on your Mac, and select your phone.
At the top of the Finder window tap Files, then:
- Transfer from Mac to iPhone: This is the option you’ll choose if you’re dragging files from your Mac onto your iPhone.
- Transfer from iPhone to Mac: Choose this option to move video files from your iPhone to your Mac. You can click on the little triangle next to an app name to see the files on your iPhone. Click on the photos or videos file and drag and drop the videos you want to move into the Finder window on your Mac.
If you want to delete a file on your iPhone while you’re organizing your content this way, just select it below the app name, and press CMD-Del.
How to Transfer Videos from iPhone to Mac
There you have it, a whole selection of ways that you can transfer videos from iPhone to Mac computers. You can pick any of the options above as a great way to back up the content that you don’t want to lose on your iPhone.
Regularly backing up your videos is a great way to make sure that you don’t accidentally lose any precious memories. We’d also recommend backing up your videos and all your other valuable content from time to time for other reasons. Backing up your content before a system reset is essential to keep hold of your videos, photos, and contacts.
Backing up your phone before you trade it in for a newer model also means that you can transfer the files you have on your Mac onto your new iPhone when it arrives. Remember, if you’re moving files from your phone to your Mac because you’re selling your old iPhone, wipe the phone and sign out of iCloud before you hand it over to the new owner, but after you’ve completed the backup.