
Apple has always been known for its solid security features. But with the rise in popularity of MacBooks, cybercriminals have started to focus more on attacking these devices.
Case in point: a study in 2021 found that macOS malware development increased by over 1,000 percent in 2020, with over 674,273 new malware samples discovered.
Being aware of macOS security features will help you know how to protect your data. After all, your data is only as safe as the security measures you have in place. Take the time to review these macOS security features to make sure you’re doing everything you can to keep yourself safe out there.
Table of Contents
MacOS Security features: General Tips for a Secure Mac
- Keep your version of macOS up-to-date. Software updates not only help keep your Mac running smoothly, but also include bug fixes that contribute to overall security.
- Turn off your wi-fi connection’s auto-join feature and avoid joining public wi-fi connections
- Only click links or download apps and files from trusted sources
- Be cautious about the websites you visit
- Don’t respond to suspicious pop-ups and messages prompting you to install an app or require your password
- Don’t install Adobe Flash Player as it was discontinued in 2020 meaning most Flash Player downloads right now are fake
- Create strong passwords and never reuse them
1. Instant Screen Auto-lock
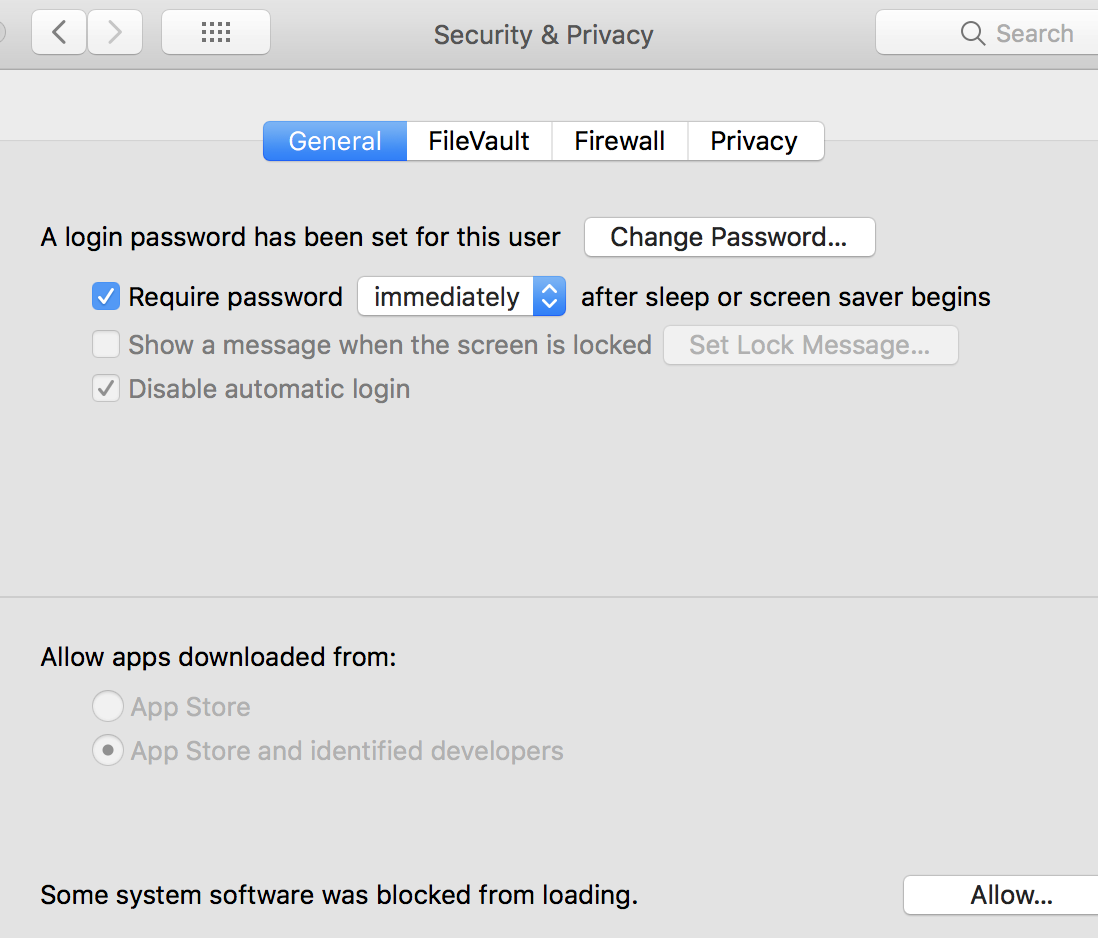
One of the simplest but commonly overlooked macOS security feature is the screen auto-lock. You can use this to the fullest by setting its “Require Password” feature to “Immediately.” This will instantly log out your Mac user account no matter how short of a time you haven’t been using it.
Say you doze off while working in a cafe; this feature will prevent the person beside you from taking advantage of the information on your screen.
Though instant auto-lock can be pretty annoying at first, this will be helpful for when you need to step away from your Mac in public or (we hope not) if your mac gets lost or stolen.
How to set up Auto-Lock:
- Click on the Apple menu logo.
- Go to System Preferences and under it to Security & Privacy.
- In the General tab, click on Require Password and set it to Immediately.
2. FileVault Encryption
FileVault is one of the most integral macOS security features, especially if your MacBook falls into the wrong hands. Setting up FileVault will encrypt your hard drive, making it inaccessible to anyone who doesn’t have a unique decryption key.
This means even if someone bypasses your admin account password, they won’t be able to see any of your important files. FileVault will also delete the decryption key from memory after some time, making it impossible for anyone to access your data.
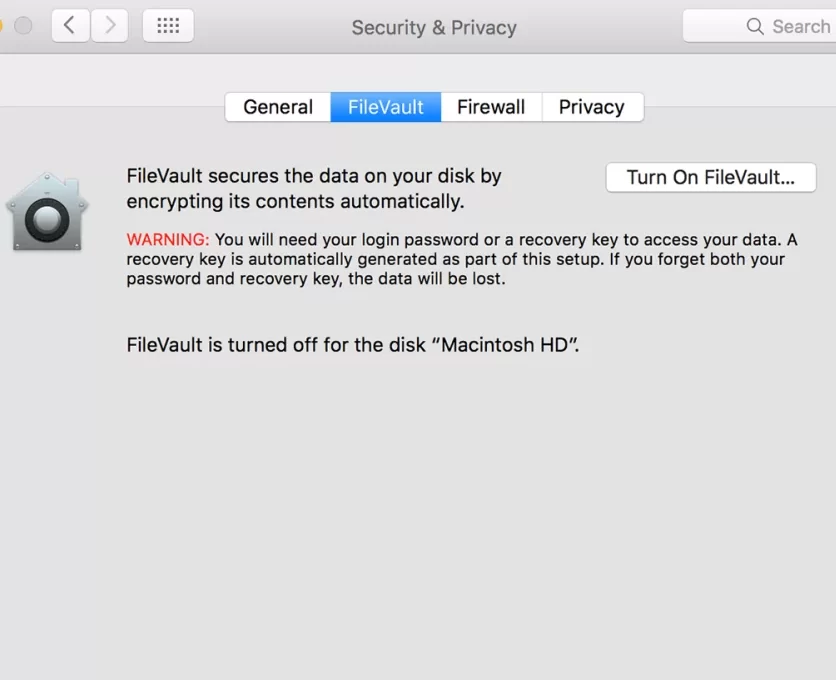
To set up FileVault, follow these steps:
- Click on the Apple menu logo.
- Go to System Preferences and under it to Security & Privacy.
- Click on the File Vault tab and press “Turn on FileVault“
- You will then be prompted to create a decryption key.
- We also recommend encrypting external drives connected to your Mac with Filevault. This can be done by clicking “Turn On FileVault” when connecting to an external drive.
3. Firmware Password
For an extra secure mac, setting up a firmware password gives an extra layer of protection from tech-savy hackers. It will require a password whenever you start up your Mac in an unusual way like booting it from a different device, in the recovery partition, or using a startup key combination.
Apple Silicon Macs, however, no longer require a firmware password because of its upgraded FileVault feature. The following steps on how to set a Firmware password on Macs, therefore, only apply to macs with Intel chips (which still makes up the majority of macs in operation):
How to set a firmware password on an Intel Mac:
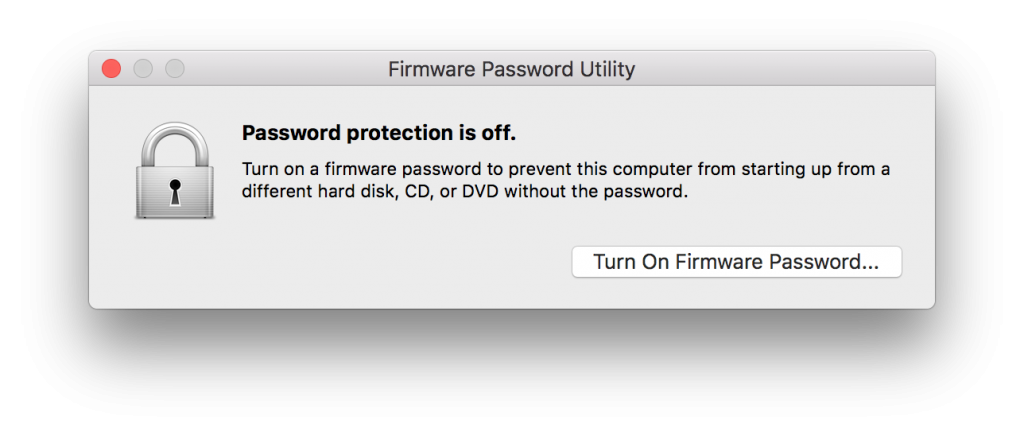
- Turn off Mac
- Boot to recovery partition by holding Cmd + R during startup
- Go to the Utilities menu
- Choose Startup Security Utility or Firmware Password Utility
- Click Turn on Firmware Password in the pop-up
- Enter a strong password you’ll remember.
- Restart your Mac from the Apple menu.
Be sure to follow step 5 because your Firmware password (unlike your admin account password) will not be easy to reset. If you forget it, you will need to bring your Mac along with a proof of purchase to the Apple store to have it reset.
4. Mac Firewall
A firewall is your first line of defense against attackers or external threats getting access to your system. Enabling your mac’s firewall is sometimes seen as unnecessary since most internet routers already have a firewall.
Having it turned off also makes it easier to set up connections with other Apple devices. Then again, enabling your Mac’s firewall is still highly recommended if you join public networks frequently.
To enable your firewall, follow these steps:
- Go to System Preferences and then Security & Privacy pane.
- Click the Firewall tab.
- Click the lock icon to unlock it, then enter an administrator name and password when prompted (the same password you use to log in to your Mac).
- Click Turn On Firewall
- Customize preferences by clicking Firewall Options.
- To make it more difficult for hackers to find your Mac, you can also enable “Stealth Mode.” This will prevent your Mac from responding to port scans and connection attempts from unknown sources.
5. XProtect Virus Scanner
In case you didn’t know, mac’s built-in antivirus software is called XProtect. It works by scanning apps when they are first launched or updated and stops malware from running if detected.

The good news is that XProtect needs no user configuration and automatically runs in the background to keep you protected to the best of its capabilities. Just make sure you’re keeping your OS updated, and you’ll be fine.
On the flip side, XProtect still has vulnerabilities. One of it, according to MacWorld, is that it doesn’t look for as many strains of malware as dedicated mac antivirus software.
In 2021, Apple’s Head of software, Craig Federighi, even admitted that “the level of Mac malware is unacceptable” as the number of reported Mac infections surpassed that of Windows.
So, while XProtect does protect against malware, it’s important to know that it’s not as comprehensive as third-party mac anti-malware software out there.
We recommend researching which one will best suit your needs as well as going for AV software that won’t slow down your Mac as a tradeoff between speed and protection is common.
6. App Sandboxing and Gatekeeper
In line with Xprotect, macOS security features also include other helpful security software such as App sandboxing and Gatekeeper. Both apps are part of macOS’ System Integrity Protection (SIP) and they go hand-in-hand in protecting macs from unauthorized codes.
Though App Sandboxing doesn’t strictly guard against malware, it does limit what the malware can do. App sandboxing restricts apps from accessing critical folders or files on your Mac that unknown sources, including malware, could damage.
Whereas, Gatekeeper protects from malicious apps by preventing mac users from installing apps from unauthorized developers. This means you can only download applications from either the App Store or Identified Developers.
Otherwise, this notification safeguarding you from unknown sources and malware will appear:

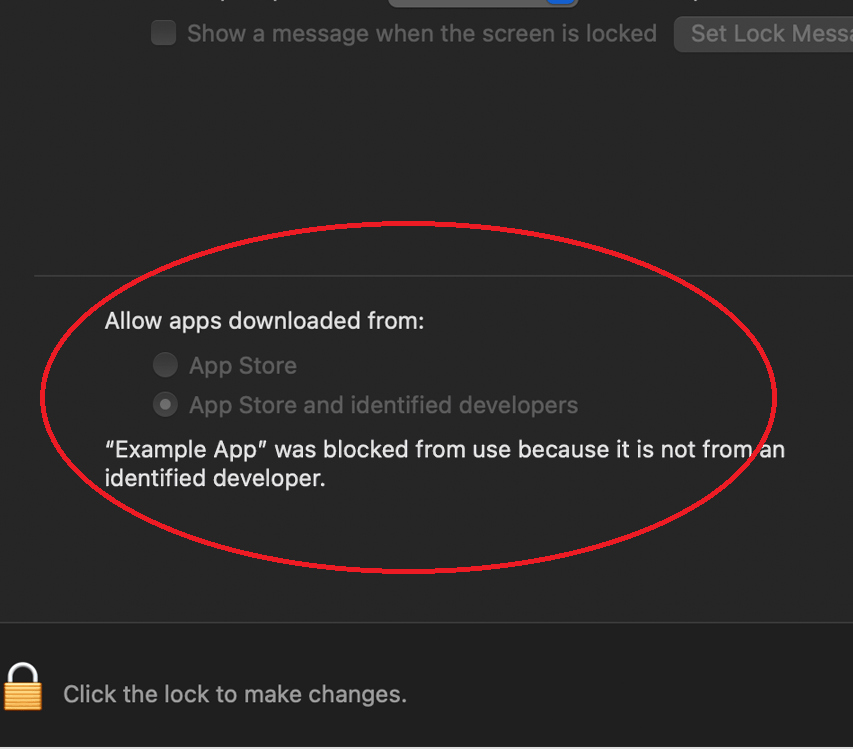
You can adjust Gatekeeper settings, by following these steps:
- Go to System Preferences
- Select Security & Privacy, then go to the General tab
- Choose whether to Allow applications downloaded from “App Store” or “App Store and Identified Developers.”
Ever since MacOS Catalina, Gatekeeper also checks for malware and other issues every time you run any software.
7. Keychain Access Password Manager
One of the best ways to protect any account is using a complex password. However, remembering many passwords can be difficult, especially if they are different for each account. This is where the Keychain Access app comes in handy.
Keychain Access app stores all of your passwords and allows you to access them whenever you need them. It also keeps track of when your passwords expire, so you can always stay up-to-date.
Keychain Acess is highly secure and uses state-of-the-art encryption techniques to protect your passwords. The keychain file is encrypted with a unique key for every device. This means that even if someone managed to steal your keychain file, they would not be able to access your passwords without knowing your computer’s encryption key.
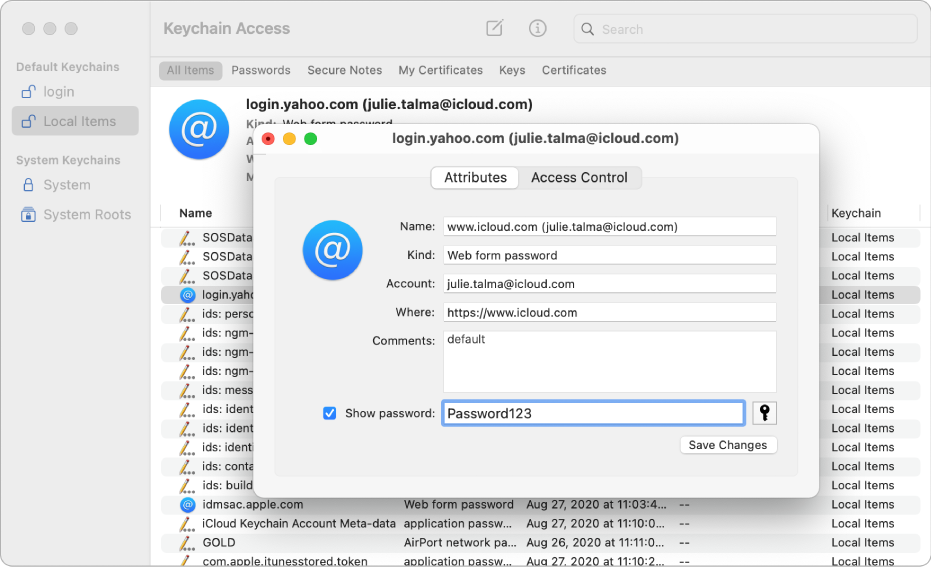
So, if you are a mac user looking for a password manager, look no further and just follow these steps to get to the Keychain Access app:
- Go to the Utility folder in your Applications folder.
- Doube-click Keychain Access
- Once it launches, you’ll see several ‘keychains,’ including the Login keychain. This is where passwords for different websites are stored after you’ve agreed to a ‘save password’ pop-up in your browser.
You can also store your Keychain online in your iCloud so that you can access it from other devices, including iPhones, iPads, and other Macs.
8. Recording Alerts

In macOS Monterey, mac users will be alerted if any application or device is accessing their microphone or camera. The macOS recording alert will appear as an orange dot in the menu bar to help guard against unauthorized surveillance.
9. Mail Privacy Protection
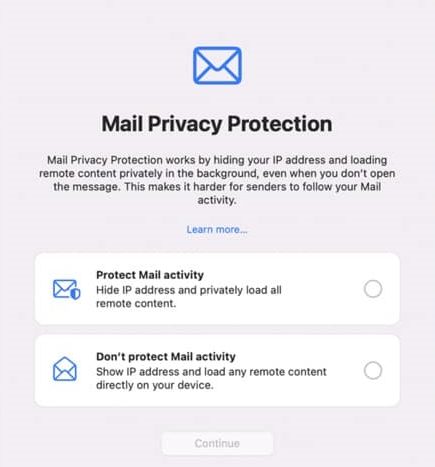
Mail Privacy Protection is another new feature in macOS Monterey. This prevents email senders from tracking whether you have opened an email or know your location from your IP address.
You can check if the feature is working in your Mac by following these steps:
- Going to the Mail app on your Mac
- Click on Mail in the menu
- Choose Preferences
- Go to Privacy and check if “Protect Mail Activity” is enabled (it should be by default).
10. Find My Mac
The last and most famous of macOS security features in this list is Find My Mac. Custom-made to hunt down mac thieves, Find My Mac allows you to track your device’s location, lock it, and even erase all of its data if needed.
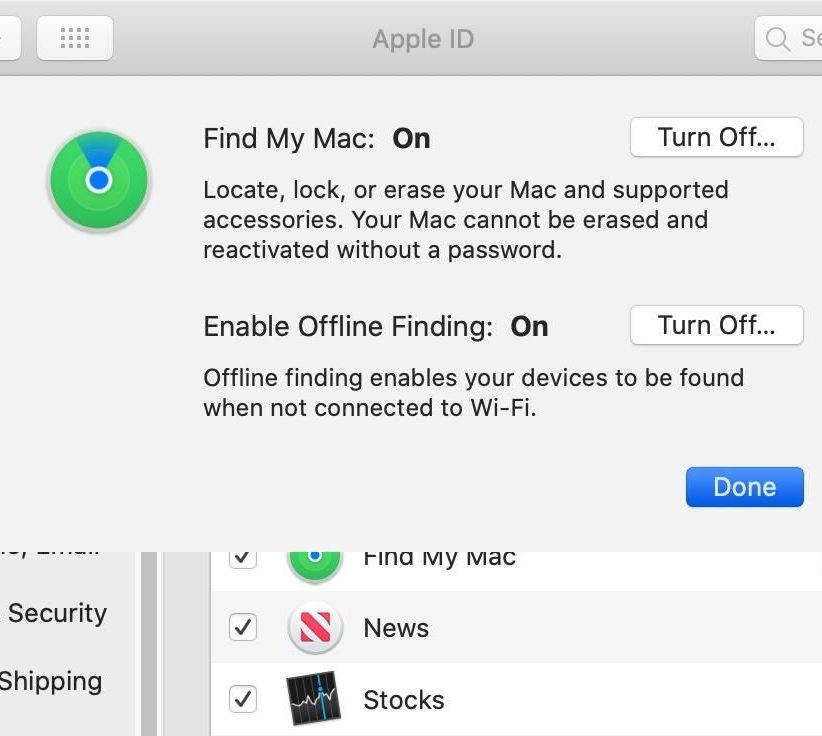
Here’s how to configure Find My Mac:
- Open System Preferences.
- Choose Apple ID or Internet Accounts.
- Select iCloud from the list.
- Tick Find My Mac, then Allow access.
You can now track your device from iCloud.com or the Find My iPhone app on another iOS device.
So there you have it: a comprehensive list of macOS security features that will help keep your computer and data safe!
If you’ve discovered other macOS security features, feel free to comment below!