
Wondering how to backup iPhone 8 contacts, files, and data?
You’ve come to the right place.
Most of the time, a backup is something we only think about when it’s too late.
Maybe you noticed that your iPhone is glitching and it’s not saving content the way it should be. Perhaps you decided to trade your device in for a new model, or you’ve dropped it somewhere and damaged the screen.
Making the decision to backup iPhone 8 files and data regularly could mean that you avoid losing some of the most valuable content you have on your phone when things go wrong.
When you backup iPhone 8 devices to cloud or computer locations, you give yourself a convenient way to restore your data whenever you need it.
So, where do you get started?
Table of Contents
Know When to Backup iPhone 8 to iCloud, Mac, or Computer
Apple, the makers of the iPhone, recommend backing your iPhone, iPad, and iPod devices frequently. As they note, backing up your device means that you don’t lose your data, even if you switch to a new device.
Unfortunately, it’s easy to forget about regular iPhone backups when living your everyday life.

The unfortunate truth is that most devices will stop working at some point or another, even if you have the latest iPhone. Since the iPhone 8 is a bit outdated, it’s even more likely to suffer from issues that the current iPhones don’t have, such as:
- Issues with Wi-Fi Connectivity
- Excessive overheating in use
- Getting stuck in recovery mode
- Getting stuck on the Apple logo
- Failing to connect to Bluetooth
Many of those issues aren’t just problematic from a user-experience perspective. They can also make it difficult to back your phone up when you decide it’s time to save your data. Before you can learn how to backup iPhone 8 data, you might need to discover how to get away from the Apple logo page.
Backing up regularly is also a good way to protect yourself from any firmware glitches. If Apple releases a new version of the iOS system, then backing up before your update means you’ll have a reserve of your data if anything goes wrong.
Ideally, you’ll want to arrange a backup at least every month or so, depending on how much data you collect or store. If you have some particularly valuable information on your iPhone 8, you may want to conduct backups more regularly.
How to Backup iPhone 8 to iCloud
Let’s start with the most obvious option, learning how to backup iPhone 8 to iCloud. When you visit Apple’s website looking for backup options, they’ll suggest two main routes:
- Backup iPhone 8 to iCloud
- Backup iPhone 8 to computer

Learning how to backup iPhone 8 devices to iCloud is usually the simplest solution. This strategy works for virtually all iPhones with access to the internet, including the iPhone 8, and iPhone 8 Plus. What makes the iCloud so appealing for a backup, is that you can set your data saves to happen automatically. For instance, you can make it so every time you’re connected to Wi-Fi, you automatically sync any new data from your iPhone to your iCloud account.
To start, connect your phone to Wi-Fi by going into Settings and Connectivity. It much easier to transfer data with a constant Wi-Fi connection.
Ensure you’re signed into your Apple iCloud account by tapping on Settings, then your name. If your name doesn’t appear, you’ll be prompted to create an Apple account.

Tap the tab that says iCloud and choose iCloud backup
Once Apple iCloud backup is on, you can go through the various options in your Apple ID settings to decide what you should save. When the slider next to the option is green, it means saving is turned on.

For photos, if you want to save everything to your iCloud account, then you can simply leave the service turned “on”. You may decide to save specific images, which means tapping on photos, and choosing which photos or albums you want to preserve.
Once you’ve chosen what you want to save, Apple will automatically sync your iCloud information with your phone whenever you have an internet connection. That is until your iCloud storage package runs out. You only get 5GB of data for free.

If you want to increase your storage limit, you can do so by tapping on Settings then your name, and iCloud. From here, click on Manage Storage, and Change Storage plan. You’ll need to enter your Apple ID username and password when prompted.
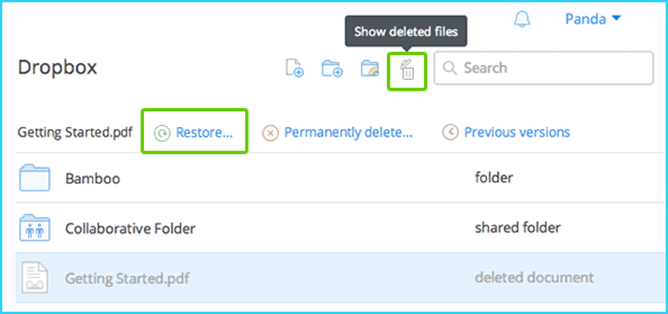
If you think that the iCloud backup option is too expensive, you can set up your phone to do regular cloud backups with other third-party providers. Companies like Dropbox offer a backup service for iPhones where you can access your files through an app on your device.
How to Backup iPhone 8 to MacOS
When it comes to learning how to backup iPhone 8 data, using iCloud is the simplest option. You don’t have to remember to regularly sync your backups and update your information. Plus, you can access your information anywhere you have a connection to the cloud.
However, an iCloud backup isn’t your only option. You can also choose the “iPhone 8 backup to computer” method which works for Macs and Windows devices.
In the original days of the iPhone 8, you’d typically backup your iPhone using the iTunes app. However, following the 10.15 Catalina update, Apple discontinued the iTunes app.

If you want to backup your iPhone 8 now, then you need to use Finder which works a little differently.
The first step is still the same. You’ll need to connect your iPhone 8 or 8 Plus to your Mac device. If you haven’t made this connection before, you’ll need to sync using a USB or USB C cable first. After you connect the device, the icon will appear in the sidebar in Finder.
If you’ve already connected your iPhone, you can set up Wi-Fi syncing.
To enable Wi-Fi syncing, link your phone to the Mac using a USB-C or USB cable. Turn on Wi-Fi syncing by clicking on Finder on your Mac, and selecting the device:

Select the box for “Sync with this device over Wi-Fi”.
![The sync options showing tickboxes to manually manage content items with the “Show this [device] when on Wi-Fi” tickbox identified.](https://www.gizmogrind.com/blog/wp-content/uploads/2021/02/backup-iphone-8-8.png)
Once you’re connected with your Mac via Wi-Fi or cable, use the sidebar to open the Finder window, and look for the Locations section. When you see the name of your phone, click “Trust”.
A screen should appear that’s almost identical to the iPhone management screen from iTunes.
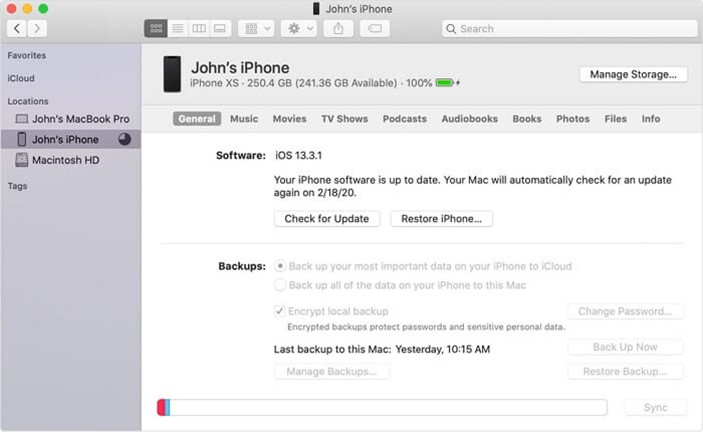
In the Backups section, click into the General tab and click on Back up all the data on your iPhone to the Mac. You can also encrypt the local backup if you have an Apple watch that you want to backup at the same time.
Before your content begins syncing, you may need to enter your passcode on your iPhone. Once you do, the backup should start. Try to avoid disconnecting your devices from the internet while the backup is happening.
How to Backup iPhone 8 to iTunes
Since iTunes has been discontinued, it’s unlikely you’re still using that service to backup your iPhone 8 information. However, if you still have an iPhone 8 or iPhone 8 Plus, there’s always a chance that you might have an older version of the MacOS too, where iTunes is still available.
If you’re still using iTunes, connect your phone to the computer you want to sync with. You can use the guidelines above to connect via Wi-Fi. Alternatively, just use your USB cable. You may need to open iTunes if it doesn’t launch automatically.
Click on the upper left corner of the iTunes Window to access your settings and click on your iPhone management screen.
Beneath the playback controls, you should be able to find a “backup” options that includes an option for “This computer”. Check the box and click back up now to start the sync immediately.
If you don’t have iTunes but you don’t want to use Finder either, there’s another option for your iPhone 8 backup to a computer. You can use a third-party software solution, like the EaseUS MobiMover software.
Some people prefer to use third-party software when learning how to backup iPhone 8 content. As it means that they can potentially back up more files and information. Alternative tools may also give you more control over how you backup iPhone content either in bulk, or individually.
To backup iPhone 8 phones using something like EaseUS MobiMover, you’d follow the same steps you’d use to connect your phone to your computer for iTunes or Finder. Launch your third-party software and go into the Backup Manager section, then Backup.

For this software, all the supported files may be selected by default. Clicking “One-click backup” will automatically start moving files from your iPhone to your Mac or Windows device.
You’ll need to wait until the backup completes fully before closing the software or disconnecting your phone. When the backup is complete, you should be able to access your files from the Backup Manager section of the service. This will be where you can Restore your iPhone information later.
You could also take the files from your iTunes, Finder, or third-party apps and store them in another location elsewhere in the cloud, like Dropbox or Google Drive.
How to Restore iPhone 8 Data
Learning how to backup iPhone 8 data and information is just the first step of the journey.
Once you know how to backup and preserve the information on your phone, you also need to know how to retrieve those backups whenever you need them. Most third-party tools for iPhone backups will allow you to simply follow instructions on an app to retrieve a backup.
For instance, if you’ve been backing your iPhone data up on Dropbox, you can go to the Dropbox app click on “restore from iCloud backup” and enter your iCloud account to access the information stored there. If you’re restoring from your computer, you’ll need to download the file back onto your computer, then connect to your iPhone via cable or Wi-Fi link.
If you’re restoring information from an iCloud backup, the process is similar.
All you need to do is turn on your iPhone 8 or iPhone 8 Plus and go to the Apps and Data screen. Click on the option to restore from iCloud backup and enter your Apple ID information.
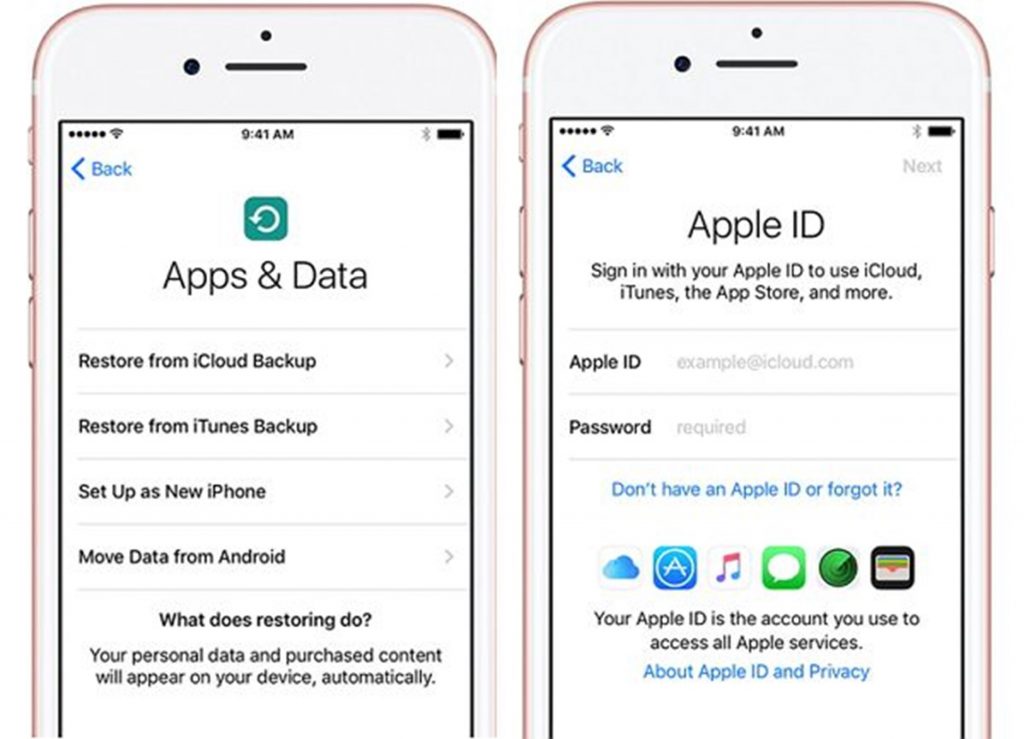
When you sign into your account, you should be able to choose your preferred backup from a list of your most recent saves. You will need to ensure that your phone can stay connected to the cloud (and the internet) for the process of the entire backup before you finish the setup process and retrieve your data. Contents, including your apps, music, photos, and other details will probably continue to restore in the background for a while, if your device is connected to the internet.
If you’re restoring data from an iTunes backup or your Mac computer, connect your iPhone 8 to the device using your USB cable (or a Wi-Fi connection). Enter the passcode for your device when prompted and select trust this computer.
Select your iPhone 8 from the list of devices provided and click on the Restore Backup option in iTunes. You may need to locate and select the backup file you want to use. Make sure you save this file with a memorable name just in case.
Click Restore to complete.
Protect your iPhone Data
Whether you’re planning on upgrading to a newer phone after years with your iPhone 8, or you’re keen to protect some important information, regular backups are important. Knowing how to backup iPhone 8 data and information ensures you won’t lose anything you need from your phone, including your photos, files, and contact details.
We recommend backing up your data frequently to avoid any disasters. Using a cloud-based service, whether it’s iCloud or something different, could be a good way to ensure that you don’t forget to sync your latest information.
Don’t be caught off guard, wishing you’d dedicated time to a backup.